Showing posts with label solar air heater. Show all posts

Tuesday, December 2, 2008

Solar Air Heater Results

     Here are the promised results - kind of. For a few hours in the middle of the day, the thermocouple measuring the temperature of the air coming in the house didn't return a reading. I suspect that this is due to the fact that I never soldered them, so as it got warmer and warmer, the two wires separated. I'm going to solder the thermocouple today and take some more readings. I assumed that temperature stayed at least as high as right before it quit reading. I think it's a fairly safe assumption since when it did start reading again it was within a degree or two of when it stopped.
     I also think that the temperature is way too high. I'm sure that I am losing heat to the environment so I plan on installing another snap disc sensor to control three more fans. I'll have these fans turn on when the air entering the house exceeds 110°F and turn off when it drops below 90°F, just like the fans in the heaters. I'll install these at the air intake in the house, hoping that the additional air flow will keep the temperature of the heaters and duct work lower, but increase the overall temperature in the house. I also plan on monitoring the temperature in the room where all the air blows.
     My wife turned the heater off yesterday at 10:40am and back on after 4:00pm. That's one fifth of the day. I hope that correlates with at least one fifth of my gas bill. We'll see...

Monday, December 1, 2008

Solar Air Heater - Project Complete

     They're done! They're installed! They're running right now! What else is there to say?
     The scaffolding lifts them off the ground six feet. This should get me about two hours more of run time per day. I wanted to use one more set of scaffolding to get them up higher but I'm not sure it's worth the risk. If we have wind like we did November 20th, I doubt these will survive being as high as they are. This picture was taken before I finished ducting them to the house - minor detail that DIYers will notice, so I thought I'd mention it...
     Tomorrow I'll post the heating results from today - temperature in versus temperature out. In a month or so, I'll post the $aving$ realized for November/December - with one unit installed temporarily for half the time and three units installed for the other half of the time.
     The actual costs (not including taxes) for building each unit are posted below.

Monday, November 24, 2008

Another Solar Air Heater Update

     I wish this were the last update on this project, but nothing goes quite the way that it is planned. I have had one heater temporarily installed for the past week with promising results. Temperatures coming out of the vent in the house have ranged between 90°F and 158°F between 10:10am and 4:00pm. I think that the time giving off heat will increase by around an hour by lifting them off the ground as originally planned. There seems to be plenty of sunlight by 9:00am but the current location is still in the shadows. Also, it is shaded by the garage around 4:00. I look forward to installing the scaffolding that will get them around 10 feet higher.     I completed another unit this weekend, but haven't installed it - I want to have the next two installed without doing any temporary ducting. We'll see what the week brings.
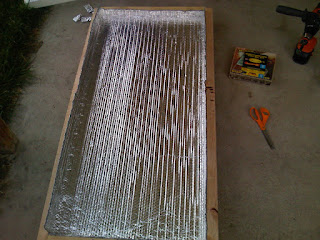
     So I guess, it's time for an explanation. After the main structure, insulation, and air channels comes snap-disc sensor (a bi-metal disc that will turn the fan on at 110°F and off at 90°) and the heat transferring surface. The sensor is installed near the top with the wiring exiting out the side running down to the fan. Then, starting at the air intake, I covered the channels with heavy duty kitchen aluminum foil. I fixed it in place with staples, then after getting each piece in place, I went back lining all edges with wire that I stapled in place with an air gun. Well, almost all edges. I missed one and now there is a visible gap in the heating surface.
     Then I placed 1x2 all the way around the outside edge to create another insulating air gap and to get the total depth close enough to the width of my steel studs.      I put the extruded polycarbonate on top, lined the sides with 1" rigid foam and screwed the steel studs to the sides.     Naturally, the second unit turned out a little better than the first, practice makes perfect - I suspect if I build a hundred more of these, I'll be making some amazing heaters...

Monday, November 10, 2008

How I lost $5000

     Here is a short story on how I lost $5000. http://www.yourcachevalley.com/2008/11/10/5000-in-the-bag-and-i-lost-it
    I hope you enjoy it.

Wednesday, November 5, 2008

Solar Air Heater Update

     Well, I guess that it's about time for a solar air heater update. I've actually made time in the last week to work on them, so, after 7 hours of work, there is visible progress. It's always exciting to see the images in my head becoming reality in the shop (1-car garage that I'd never park a car it but it will never fall down so I can replace it either...)
     To start, I attached a 0.25"x4'x8' piece of moisture resistant plywood to a 1"x4'x8' piece of R-tech insulation foam board with 2x2s on the opposite side. The plywood is for strength and structure to attach fans and ducting to. The foam is to insulate the warmed air from the exterior air temperature.     The next step was adding double foil, double bubble on top of the R-tech insulation. There are two reasons for this - one, added insulation with minimal thickness - I'm using metal studs to "encase" the outer edges and they're a finite depth of 3.625", and two, I'm not sure if the R-tech insulation boards can handle the heat that I hope will be inside these heaters - I suspect that they won't melt, but just in case...     After that, I installed the 2x2s that channel the air in a serpentine fashion so that it can collect enough energy to overcome any heat loss in the ducting and still feel warm as it blows in to the house.     I've actually already cut the holes for the air intake and exhaust but don't have a photo of that.
     This may all look a little haphazard, but it's actually sort of well thought out. There are calculations that need to be done based on the square footage of the collector and the altitude (to compensate for air density differences) to determine the channel's cross sectional area for optimal heat transfer. Based on Logan's altitude and a collector that is 4'x8', I needed a cross section of 15.22 square inches. With the 2x2s around the outside and creating the channel, the air-gap between them is 10.25". 2x2s are 1.5"x1.5" so the channels' cross sectional area is 10.25" * 1.5" = 15.375 square inches - close enough.
     I'll post a detailed list of the costs later, but so far it looks like each will cost around $175 to make - significantly less than smaller units I've seen during my research that sell for over $1,700. By the way, there are three of these, so I won't be able to recover my costs this winter since my heating bills for November 15th through May 15th total around $510 and that includes water. But I think they will accomplish one thing that will make it all worth it - Jeri Dawn shouldn't freeze this winter - the past three years, the thermostat has been set at 66°F during the day and between 57 and 61°F at night. We should be able to keep the temperature just above Travis and Crystal's subarctic apartment and do it without spending more than last year. After all, the goal wasn't just to save a little money, it was a fun project (that is being funded by a bonus from my awesome job) that will make us more comfortable without giving all our money to Questar Gas! I'll keep you posted.

Monday, October 27, 2008

Update - it's been a month

     I guess that it's time for an update. It's been nearly a month since the last post - a month that was busy, but I didn't really do much in the way of 'projects' - boo.
     I did spend a week in Glendale Arizona learning more about real estate investing. I enjoyed it immensely and definitely think it is worth every penny. As an added bonus, on the way back we stopped in Las Vegas and ate at Wolfgang Puck's in the Venetian - my favorite restaurant and we also got to see the best fountain show at the Bellaggio - the Sarah Brightman and Andrea Bocelli one. I'd love to take Jeri Dawn down to Vegas for those two things. Darrin played roulette a few times. If he had done what I said, he would be $18,000 richer, but he played it smart (as smart as you can play a game of chance) and only ended up with $60.
     I finally have my polycarbonate - BJ picked it up in SLC for me - with shipping, it was around $64 as sheet. Saturday I bought the insulation boards and framework. This week I expect to get started on actually piecing it together. Then onto the duct work. I need to finish it soon for two reasons:
   1) The longer it takes, the less time I'll have to take advantage of it.
   2) I've decided not to listen to Christmas music until it's done. It drives me nuts to skip all the Christmas songs in my playlists.
     I haven't worked much on swimming. I did see some significant improvement while I was swimming each week, but there were other pressing things this month...
     Last week I ran more than I've ever run between Sundays - 53.1 miles. I've added a couple miles to a couple days and felt like running Friday morning. Other than the strange weeks, it's the first time I've run on Friday and definitely the only time I've run on Friday in addition to the regular training. Saturday wasn't really long - just 17.6 miles. I'm working on my game plan for Running from an Angel - it has 2400 feet of ascent and 2400 feet of descent - it's a killer. The winner the last time ran it in 3:22 - 50% longer than your typical marathon run. If I add 50% to my time, that puts me over 5:21. That's way too long time to be running! This Saturday is the 1st Dam 5k/10k - I still haven't decided if I should try to beat my 5k time from last year, or run my first 10k...
     That pretty much sums it up. You can check out my running blog at http://hazlon.fastrunningblog.com/. Jeri Dawn is trying to win a $50 gas card - you can help by going to http://www.yourcachevalley.com/stories then clicking on the one titled "Living in Logan" - if you click others that were written after Saturday you'll be helping someone else...

Monday, September 8, 2008

Project Updates

     Projectwise, the weekend was pretty good to me. Jeri Dawn got up early and left to help a friend with a garage sale. By 9:00am, the girls were too awake for me to stay in bed. After breakfast, I decided that I would try to finish cleaning and organizing the garage. The girls were good and I got a lot done by 11:00am. Just as we were leaving to go get free raspberry and strawberry plants, Jeri Dawn got home. So we all went to Wellsville to help an older couple thin out their raspberries and strawberries. They had placed an ad in the paper that Jeri Dawn told me about - I was one of the first to call, and after 20 people they had to start telling people that they were all out. We ended up with well over 30 raspberry plants and at least 25 strawberry plants!
     We had a little lunch and I went back to the garage. Jeri Dawn planted most of the strawberry plants, then I did the raspberry plants and the rest of strawberry plants. The garage is almost done! I can access almost everything easily, I have room to work on projects, and I still have shelf space available!
     After all the work, it was 6:30pm, so I lit the briquettes and made some burgers! Steven came for the BBQ and brought a delicious watermelon. We discussed the upcoming solar projects and set some deadlines to get things done. I've decided that I'm not going to listen to Christmas music until my Solar Air Heaters are installed - quite a sacrifice but hopefully a good motivator. I also found at least 2 alternatives to purchasing the polycarbonate sheets online - both of which are cheaper and cheaper delivery! I previously planned to spend around $350 to get 3 sheets, then $215, and now there's a possibility that it will cost just over $100! This news came while working on a scout fundraiser at Anderson Seed and Garden "fluffing" Christmas trees. Their green house is made out of the material I want to use and Mark Anderson (the owner) thinks he can get it for $18 less per sheet and minimal shipping costs. I'll find out more soon.
     Unfortunately, in all the fun on Saturday, I missed my long training run for the marathon. So this morning I put in 14.1 miles before work. My average mile time was around 7:28 - a little slower than I had hoped. I did run a route that included the last 7.2 miles of the TOU Marathon - that took 53:48. I guess if I'm going to qualify for the Boston marathon, I'll need to be at the 19 mile mark before 2:17:12 to complete it by 3:10:59.
     My swim training didn't go as planned on Thursday. Apparently the outdoor pool is closed so some swim team was using 3 lanes and an aquatic aerobic class also started the same day. I spent the first 40 minutes at going back and forth less than 1/2 the length of the pool. I did get my goggles adjusted pretty well - it's more enjoyable to swim without water in my eyes! After the swim team was done, I did 13 laps (2x25 yards) in about 40 minutes. I didn't use a kick-board at all, but did stick with the pull boy. In 2/3 of the time, I did 3/4 of the laps compared to the previous week. I suppose that is an improvement!

Thursday, September 4, 2008

Solar Air Heater Proto

     Shortly after moving into our home on Canyon Road, winter rolled in. When our gas bill arrived in the middle of December (2005), Jeri Dawn wasn't impressed - it was around $150. She said, "We have to do something about this." It seemed to me we had terrible drafts from the ancient windows. So I went to Home Depot and purchased 5 or 6 sheets of 2" foam insulation boards (4'x8') that I cut to fit tightly into the window openings. This reduced the drafts and heat loss, so we also reduced the temperature settings. My wife thinks the sub-arctic temperatures at night were a little too low. The following month our bill went down around $20 while my friend Jake Sanchez's bill went up another 35%. I figure that we saved the $120 spent on foam in the first winter.
     By the time summer rolled around, Jeri Dawn asked me to leave the foam in quite a few of the windows to keep the heat out of the house and the light out of the kids' rooms for nap time. Other pieces have been removed and added each year, many of which may need to be replaced soon.
     The next winter, in an attempt to reduce costs even more, we bought electric blankets, allowing us to lower the temperature even more at night. The morning temperature setting usually kicked in when all my girls woke up. I usually got up about an hour before that - man, was it frigid. Most of the winter, we wore slippers and sweatshirts - it was kind of cozy.
     Last year I happened upon a website that showed a solar air pop can heater and started collecting cans. After more research I decided that the pop can idea seemed like too much work. I took a few discarded stencils (5-6 mil stainless steel sheets about 25"x25") from work, painted them black and stuck them in the south facing windows. During the day I removed the foam from the windows and attempted to heat the house with the sunlight. It would have worked better if the foam fight tightly back in the windows after each day, but wear and tear prevented it. I think we may have come out a little ahead, but not much.
     I hoped to have built doors (to match the room decor) for the south facing windows this year, but that hasn't happened yet. What? With all the other projects, who really thought that would happen? But I did build a prototype of the solar air heaters that I want to build before November. The picture only shows it partially complete, since in the excitement of completing a project, I set out to prove that it would work instead of documenting the completion. At this point there is a 2x4 frame with a 2'x4' sheet of osb on back. Inside is a 2'x4' sheet of 2" foam (leftover from the windows) covered by double foil, double bubble insulation. I cut two holes for air intake and exhaust, placed a fan at the intake, cut and placed 0.75"x0.75" wood strips to channel the air snake-like through the air-gap, covered it with a 5-6 mil sheet of stainless steel spray painted black and then mounted a piece of acrylic (polycarbonate) over the top of it all.
     To test it, I set thermocouples at the intake and exhaust and set it in the sun (at about 60° from horizontal and directly at the sun - similar to how it will be mounted in the winter but rotated 90°; this made for a pretty high angle of incidence which is a good worst case scenario for the winter.) The results are posted below. The temperature drops as the sun moves and the heater is no longer perpendicular to the sun. The temperature gain is over 100°F.


     The plan is to make 3 solar air heaters, 4'x8' each with fans that move 10 times as much air as the proto; 4 times more air because they are 4 times larger than the proto, then more than double that because the lower temperatures in the heaters means that more of the heat has already been transfered into the house! Instead of using stencils (5-6 mil stainless steel), I am thinking about using aluminum foil. Aluminum is great for heat transfer and foil is about as cheap as I can get it. I don't know if this is the best idea, but haven't yet found a reason to use anything else. Instead of an acrylic glazing, I want to get Lexan ThermoClear Multiwall sheets for added insulation. They're expensive and shipping is worse. I'm trying to find a source in the Salt Lake area. As soon as I can find those, and a few fans, I'll get started on the final project. I still haven't figured out exactly where I'll mount these or what to do about ducting...